Interact with Bluetooth devices using Google Chrome
October 26, 2020
Bluetooth is a wireless technology that enables the transfer of data between Bluetooth enabled devices within a short distance. The Bluetooth® community is making significant improvement in wireless innovation every year.
Bluetooth Low Energy
Bluetooth Low Energy is known under many names: BLE, Bluetooth LE or Bluetooth Smart. The strength of Bluetooth Low Energy is indeed its very low energy consumption which is cost-effective with a significant battery lifetime. The BLE technology provides an easy and reliable interface, which is hugely appreciated by mobile application developers, consumer electronics manufacturers and engineers. It is an industry-specific technologywhich has become suitable for the Internet of Things (IoT) allowing a quick transfer of low-consuming data such as movement, humidity or temperature.
Usually, Bluetooth is used to pair mobile devices with other mobile or fixed devices. This could be your car, your earbuds, your smartwatch or your smart light. We have seen a lot of native app available that can interact with Bluetooth enabled devices, but how about connecting using a web browser? Yes, you can communicate with nearby Bluetooth devices using a web site in a secure and privacy-preserving way.
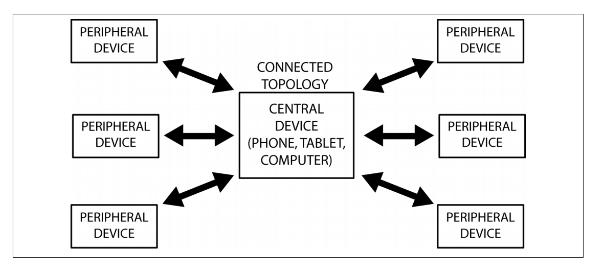
A BLE device may have two roles, central or peripheral:
Central: Central device manages the overall process by doing the scanning and connection to peripheral devices.
Peripheral: Peripheral device provides connections and data transfer with the Central device periodically.
In this article, we will try to connect BLE device with a web browser.
Things we need :
- Google chrome
- BleuIO, Bluetooth Low Energy Adapter *
* The BleuIO is Bluetooth low energy solution that can be used to create new BLE 5.0 applications in the fastest and easiest way. This device supports Windows 10, Linux and macOS.
Before we start
The article assumes you have some general knowledge of how Bluetooth Low Energy (BLE) work.
Since the Chrome Serial specification on Google Chrome is not finalized yet, you will have to go to enable the highlighted flag, and restart Chrome.
open chrome://flags/#enable-experimental-web-platform-features in chrome browser.
In this example, we’re going to use javascript + html (and some css for styling) to setup the BleuIO and quickly start scanning or advertising as an iBeacon or an Eddystone simply by pressing a button. For a quick setup, copy the following script and save it in your local directory. You can also get the source code from GITHUB PAGE.
Here is a demo of final output. View Demo

index.html
Here we create a simple html page with a title, buttons and a field to display the output. We also add a textbox that will show up if the user doesn’t meet the requirements for Chrome Serial.
<!DOCTYPE html>
<html lang="en">
  <head>
    <title>Smart Sensor Devices Web Bluetooth Example</title>
    <meta charset="utf-8" />
    <meta name="ssd" content="beaconexample" />
    <meta http-equiv="X-UA-Compatible" content="IE=edge" />
    <meta name="viewport" content="width=device-width, initial-scale=1" />
    <link rel="shortcut icon" type="image/png" href="images/favicon.png" />    <script>
      // Redirect to HTTPS if HTTP is requested.
      if (window.location.protocol === "http:") {
        window.location.href = "https:" + window.location.href.substring(5);
      }
    </script>
    <link rel="stylesheet" href="style.css" />
    <link
      rel="stylesheet"
      href="https://stackpath.bootstrapcdn.com/bootstrap/4.5.2/css/bootstrap.min.css"
      integrity="sha384-JcKb8q3iqJ61gNV9KGb8thSsNjpSL0n8PARn9HuZOnIxN0hoP+VmmDGMN5t9UJ0Z"
      crossorigin="anonymous"
    />    <script src="script.js" defer></script>
  </head>
  <body>
    <div class="codesection">
      <div class="container">
        <h1>Web Bluetooth Example</h1>
        <main class="main">
          <div id="notSupported" class="hidden">
            Sorry, <b>Chrome Serial</b> is not supported on this device, make sure
            you're running Chrome 78 or later and have enabled the
            <code>#enable-experimental-web-platform-features</code> flag in
            <code>chrome://flags</code>
          </div>          <br />
          <button id="butConnect" type="button" class="btn btn-success">
            Connect
          </button>
          <br /><br />
          <button
            id="butIbeacon"
            type="button"
            disabled
            class="btn btn-warning"
          >
            Make iBeacon
          </button>
          <button id="butEddystone" type="button" disabled class="btn btn-info">
            Make Eddystone Beacon
          </button>
          <button id="butScan" type="button" disabled class="btn btn-primary">
            Scan BLE Devices
          </button>          <pre id="log" class="mt-5"></pre>
        </main>
      </div>
    </div>
    <div class="footer text-center mt-3">
      Powered by <a href="https://www.bleuio.com/" target="_blank">BleuIO</a> .
      A product of
      <a href="https://smartsensordevices.com/" target="_blank"
        >Smart Sensor Devices</a
      >
    </div>    <!-- end container -->
    <!-- JS, Popper.js, and jQuery -->
    <script
      src="https://code.jquery.com/jquery-3.5.1.slim.min.js"
      integrity="sha384-DfXdz2htPH0lsSSs5nCTpuj/zy4C+OGpamoFVy38MVBnE+IbbVYUew+OrCXaRkfj"
      crossorigin="anonymous"
    ></script>
    <script
      src="https://cdn.jsdelivr.net/npm/popper.js@1.16.1/dist/umd/popper.min.js"
      integrity="sha384-9/reFTGAW83EW2RDu2S0VKaIzap3H66lZH81PoYlFhbGU+6BZp6G7niu735Sk7lN"
      crossorigin="anonymous"
    ></script>
    <script
      src="https://stackpath.bootstrapcdn.com/bootstrap/4.5.2/js/bootstrap.min.js"
      integrity="sha384-B4gt1jrGC7Jh4AgTPSdUtOBvfO8shuf57BaghqFfPlYxofvL8/KUEfYiJOMMV+rV"
      crossorigin="anonymous"
    ></script>
  </body>
</html>
script.js
Here we is were we handle the functionality. We hook up our buttons with click-listeners and write the functions we need.
By running:
port = await navigator.serial.requestPort();
from the serial api we can get list of avalible com ports. Then we connect to that port and start listening for input from the dongle.
The “make beacon” button functions are setup with a static version of the iBeacon and Eddystone but you can just as easily hook up an input field and plug in the value in the ‘writeCmd()’ function in a similar fashion of that of the iBeacon and Eddystone examples.
In the ‘readLoop()’ function we just print out everything we get from the dongle to the ‘log’ element. But you could just as well listen for the response message after a command that signals that the action has been successful or not (like OK, ADVERTISING or ERROR etc.) and handle that and print what you like as response.
"use strict";let port;
let reader;
let inputDone;
let outputDone;
let inputStream;
let outputStream;
let isIbeaconAdv = false;
let isEddystonesAdv = false;
let isScanning = false;const log = document.getElementById("log");
const butIbeacon = document.getElementById("butIbeacon");
const butEddystone = document.getElementById("butEddystone");
const butConnect = document.getElementById("butConnect");
const butScan = document.getElementById("butScan");document.addEventListener("DOMContentLoaded", () => {
  butIbeacon.addEventListener("click", clickIbeacon);
  butEddystone.addEventListener("click", clickEddystone);
  butScan.addEventListener("click", clickScan);
  butConnect.addEventListener("click", clickConnect);
  const notSupported = document.getElementById("notSupported");
  notSupported.classList.toggle("disabled", "serial" in navigator);
});/**
 * @name connect
 * Opens a Chrome Serial connection to a serial device such as a Smart USB Dongle 2.0 and sets up the input and
 * output stream.
 */
async function connect() {
  // - Request a port and open a connection.
  port = await navigator.serial.requestPort();
  // - Wait for the port to open.
  await port.open({ baudrate: 9600 });  const encoder = new TextEncoderStream();
  outputDone = encoder.readable.pipeTo(port.writable);
  outputStream = encoder.writable;  let decoder = new TextDecoderStream();
  inputDone = port.readable.pipeTo(decoder.writable);
  inputStream = decoder.readable.pipeThrough(
    new TransformStream(new LineBreakTransformer())
  );  reader = inputStream.getReader();
  readLoop().catch((error) => {
    toggleUIConnected(false);
    port = null;
    log.textContent = "Dongle Disconnected!";
  });
}/**
 * @name disconnect
 * Closes the Chrome Serial connection.
 */
async function disconnect() {
  // Close the input stream (reader).
  if (reader) {
    await reader.cancel();
    await inputDone.catch(() => {});
    reader = null;
    inputDone = null;
  }
  // Close the output stream.
  if (outputStream) {
    await outputStream.getWriter().close();
    await outputDone;
    outputStream = null;
    outputDone = null;
  }
  // Close the port.
  await port.close();
  port = null;
  log.textContent = "Dongle Disconnected!";
}/**
 * @name clickConnect
 * Click handler for the connect/disconnect button.
 * Checks if port != null
 * If true: Checks if any beacons is advertising or scans are running and stops the advertsing or scan if so. Then runs disconnect() and set toggleUIConnected to false.
 * if false: Runs connect() then set toggleUIConnected to true.
 */
async function clickConnect() {
  log.textContent = "";
  if (port) {
    if (isEddystonesAdv || isIbeaconAdv) {
      writeCmd("AT+ADVSTOP");
      butIbeacon.textContent = "Make iBeacon";
      butEddystone.textContent = "Make Eddystone Beacon";
      isIbeaconAdv = false;
      isEddystonesAdv = false;
    }
    // If disconnected while scanning the dongle will restart
    if (isScanning) {
      writeCmd("\x03");
      butScan.textContent = "Scan BLE Devices";
      isScanning = false;
    }
    await disconnect();
    toggleUIConnected(false);
    return;
  }
  await connect();
  toggleUIConnected(true);
}/**
 * @name clickIbeacon
 * Click handler for the iBeacon button.
 * Checks if an iBeacon is already running by checking the boolean isIbeaconAdv.
 * If isIbeaconAdv = true: Stops advertising, changes the button text and shows the Eddystone button. Finally sets isEddystoneAdv = false.
 * If isIbeaconAdv = false: Sets the advertising data to setup an iBeacon with a UUID and starts advertising.
 * Also changes button text and hides the Eddystone button. Finally sets isIbeaconAdv = true.
 */
function clickIbeacon() {
  console.log("IBEACON BUTTON PRESSED");  if (isIbeaconAdv) {
    writeCmd("AT+ADVSTOP");
    butEddystone;
    butIbeacon.textContent = "Make iBeacon";
    butEddystone.removeAttribute("disabled");
    butScan.removeAttribute("disabled");
    isIbeaconAdv = false;
    return;
  }
  writeCmd("AT+ADVDATAI=5f2dd896-b886-4549-ae01-e41acd7a354a0203010400");
  setTimeout(() => {
    writeCmd("AT+ADVSTART=0;200;3000;0;");
  }, 500); // Waiting half a bit to make sure each command will get through separately.  butIbeacon.textContent = "Stop Beacon";
  butEddystone.setAttribute("disabled", "true");
  butScan.setAttribute("disabled", "true");
  isIbeaconAdv = true;
}/**
 * @name clickEddystone
 * Click handler for the Eddystone Beacon button.
 * Checks if an Eddystone beacon is already running by checking the boolean isEddystoneAdv.
 * If isEddystoneAdv = true: Stops advertising, changes the button text and shows the iBeacon button. Finally sets isEddystoneAdv = false.
 * If isEddystoneAdv = false: Sets the advertising data to setup an Eddystone beacon with a link to google.com and starts advertising.
 * Also changes button text and hides the iBeacon button. Finally sets isEddystoneAdv = true.
 */
function clickEddystone() {
  console.log("EDDYSTONE BUTTON PRESSED");
  if (isEddystonesAdv) {
    writeCmd("AT+ADVSTOP");
    butEddystone.textContent = "Make Eddystone Beacon";
    butIbeacon.removeAttribute("disabled");
    butScan.removeAttribute("disabled");
    isEddystonesAdv = false;
    return;
  }
  writeCmd("AT+ADVDATA=03:03:aa:fe 0d:16:aa:fe:10:00:03:67:6f:6f:67:6c:65:07");
  setTimeout(() => {
    writeCmd("AT+ADVSTART=0;200;3000;0;");
  }, 500); // Waiting half a bit to make sure each command will get through separately.  //butIbeacon.classList.toggle("disabled", true);
  butIbeacon.setAttribute("disabled", "true");
  butScan.setAttribute("disabled", "true");  //butScan.classList.toggle("disabled", true);
  butEddystone.textContent = "Stop Beacon";
  isEddystonesAdv = true;
}/**
 * @name clickScan
 * Click handler for the Scan button.
 * Checks if a scan is already running by checking the boolean isScanning.
 * If isScanning = true: Stops scanning and goes back to peripheral mode, changes the button text and shows the beacon buttons. Finally sets isScanning = false.
 * If isScanning = false: Goes into Central mode and starts scanning for ble devices. Also changes button text and hides the beacon buttons. Finally sets isScanning = true.
 */
function clickScan() {
  console.log("SCAN BUTTON PRESSED");
  if (isScanning) {
    writeCmd("\x03"); // Ctrl+C to stop the scan
    setTimeout(() => {
      writeCmd("AT+PERIPHERAL"); // Set the dongle in Peripheral mode needed for advertising.
    }, 500); // Waiting half a bit to make sure each command will get through separately.
    isScanning = false;
    butScan.textContent = "Scan BLE Devices";
    butIbeacon.removeAttribute("disabled");
    butEddystone.removeAttribute("disabled");
    return;
  }
  writeCmd("AT+CENTRAL"); // Set the dongle in Central mode needed for scanning.
  setTimeout(() => {
    writeCmd("AT+GAPSCAN");
  }, 500); // Waiting half a bit to make sure each command will get through separately.  butScan.textContent = "Stop Scanning...";
  butIbeacon.setAttribute("disabled", "true");
  butEddystone.setAttribute("disabled", "true");  isScanning = true;
}/**
 * @name readLoop
 * Reads data from the input stream and displays it on screen.
 */
async function readLoop() {
  while (true) {
    const { value, done } = await reader.read();
    if (value) {
      log.textContent += value + "\n";
    }
    if (done) {
      console.log("[readLoop] DONE", done);
      reader.releaseLock();
      break;
    }
  }
}/**
 * @name writeCmd
 * Gets a writer from the output stream and send the command to the Smart USB Dongle 2.0.
 * @param  {string} cmd command to send to the Smart USB Dongle 2.0
 */
function writeCmd(cmd) {
  // Write to output stream
  const writer = outputStream.getWriter();
  console.log("[SEND]", cmd);  writer.write(cmd);
  // Ignores sending carriage return if sending Ctrl+C
  if (cmd !== "\x03") {
    writer.write("\r"); // Important to send a carriage return after a command
  }
  writer.releaseLock();
}/**
 * @name LineBreakTransformer
 * TransformStream to parse the stream into lines.
 */
class LineBreakTransformer {
  constructor() {
    // A container for holding stream data until a new line.
    this.container = "";
  }  transform(chunk, controller) {
    // Handle incoming chunk
    this.container += chunk;
    const lines = this.container.split("\r\n");
    this.container = lines.pop();
    lines.forEach((line) => controller.enqueue(line));
  }  flush(controller) {
    // Flush the stream.
    controller.enqueue(this.container);
  }
}/**
 * @name toggleUIConnected
 * Toggles the butIbeacon & butEddystone buttons visable/hidden depending on if dongle is connected or not.
 * Also changes the text on butConnect depending on the action it actually will preform in the current state.
 * @param  {boolean} connected true if connected, false if disconnected.
 */
function toggleUIConnected(connected) {
  let lbl = "Connect";
  if (connected) {
    lbl = "Disconnect";
    butIbeacon.removeAttribute("disabled");
    butEddystone.removeAttribute("disabled");
    butScan.removeAttribute("disabled");
  }
  butIbeacon.classList.toggle("disabled", !connected);
  butEddystone.classList.toggle("disabled", !connected);
  butScan.classList.toggle("disabled", !connected);
  butConnect.textContent = lbl;
}
style.css
.hidden {
  display: none !important;
}#notSupported {
  padding: 1em;
  background-color: red;
  color: white;
  margin-top: 1em;
  margin-bottom: 1em;
}.mb-button {
  align-self: center;
  background-color: #666;
  border-radius: 100%;
  box-shadow: 0 4px 5px 0 rgba(0, 0, 0, 0.14), 0 2px 9px 1px rgba(0, 0, 0, 0.12),
    0 4px 2px -2px rgba(0, 0, 0, 0.2);
  height: 30px;
  width: 30px;
}.pressed {
  background-color: #d81b60;
  box-shadow: inset 0px 0px 5px #c1c1c1;
  outline: none;
}
.caption {
  margin-top: 100px;
}
pre {
  padding: 20px;
  color: #ffffff !important;
  background-color: #222;
  white-space: pre;
  text-shadow: 0 1px 0 #000;
  border-radius: 5px;
  border-bottom: 1px solid #555;
  box-shadow: 0 1px 5px rgba(0, 0, 0, 0.4) inset, 0 0 20px rgba(0, 0, 0, 0.2) inset;
  font: 16px/24px "Courier New", Courier, "Lucida Sans Typewriter", "Lucida Typewriter",
    monospace;
}
.codesection {
  background: #0d4c8d;
  color: white;
  padding: 20px 0;
  min-height: 500px;
}
Run the web app by simply opening index.htmlin the Chrome web browser.
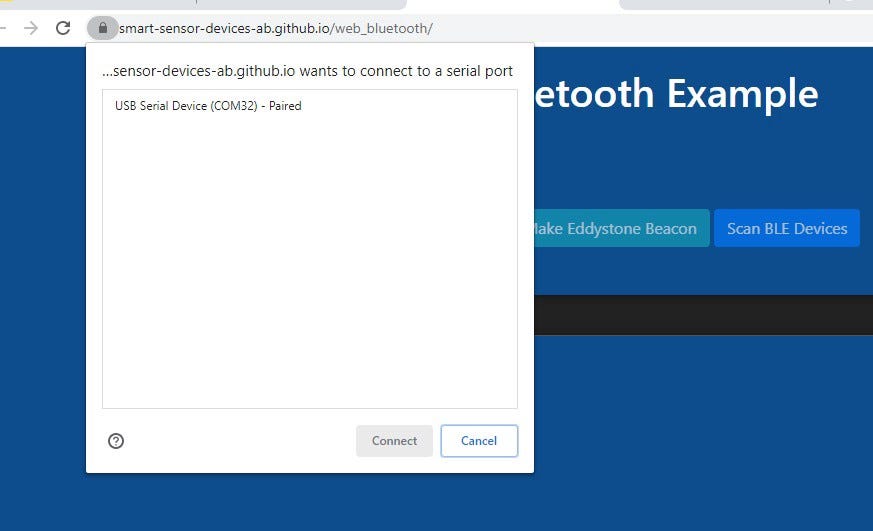
Make sure BleuIO is connected to your computer. Click Connect and wait a moment for your device to show up on the port screen.
Select your device and press Connect.
Once the device is connected. You will be able to use all the example script we prepared — IBeacon, Eddystone Beacon, Scan.
Follow this video for more details.
Facebook Twitter LinkedIn